I've seen and read about enough problems with camera and lens calibration to finally put a post up here about it. I've had issues with it myself that finally necessitated sending my whole Canon rig (including lenses) back to Canon twice to get it fixed. It's frustrating, no doubt about it.
Mass produced cameras and lenses at any price point are manufactured within a certain quality tolerance. As the following two articles concisely point out, these tolerances can sometimes combine to work against you and you'll end up with slightly out of focus images.
I've read about many ways to microfocus adjust your camera/lenses on the internet if your camera has that function, and one of the more reputable methods is posted at this link. The problem with this method is that depending on how you set it up, you can get widely variable and unrepeatable results. Not good...
So what can you do about this? As mentioned in the articles above, other than sending your whole camera rig back to your camera manufacturer (which you can't do if you use third party lenses), the main choice for repeatable consistent testing seems to be LensAlign.
Since I'm now using several third party lenses instead of Canon's, I plan to purchase the LensAlign MkII product for $80 to try it out on at least two of my lenses that I think I have some problems with. I'll post my results here...
Tuesday, January 25, 2011
Tuesday, January 18, 2011
Rogue Flashbender and Stofen Omnibounce
 |
| Photo by Neil van Niekerk |
 Accessory flashes are great devices. They open up a whole new world of lighting beyond what the pop-up flash on your DSLR can do.
Once you get into bouncing your accessory flash off of walls, ceilings, and other objects to get better flash photography results, you'll never again go back to straight ahead fired flash...which can be very harsh looking in the final photo.
The photo above by Neil van Niekerk is a perfect example of using bounced flash to fill in the existing light in a photo to get fantastic and natural looking flash results. This shot would have been impossible with straight ahead fired flash. It had to be bounced to achieve this even lighting on the girl with a nice balance of the background light. Neil is a genius on flash photography. I highly recommend his book entitled "On-Camera Flash".
If you use an accessory/external flash and you're looking to improve your results even further beyond simple bouncing to achieve the kind of results in the direction of what Neil does, then get these two cheap accessories:
- Rogue Flashbender (see video below)
- Stofen Omnibounce
Back in the day, photographers used to achieve bounced straight ahead flash by aiming their flash up and rubber-banding an index card to the flash to bounce the light forward. It worked great to bounce the flash forward, but it wasn't very flexible.

It's not often that you can buy an accessory for your camera that's cheap but has dramatic results. These two simple devices work terrific and should be in the bag of every photographer who's interested in getting better flash results.
Monday, January 17, 2011
Out of the airplane window!
Under a totally crappy user interface (Yahoo, please do some work on this!) there's some great functionality if you dig around to find it. So many great/interesting photographers out there...
While exploring some 'Groups' on Flickr and trying to find the right place to post one of my airplane photos, I ran across this link to a Group called "Airplane Wings".
One of the rules of this photo group is that the photos need to include the wing of the airplane. Interesting! Check it out for some very unique photos of the friendly skies.
Sunday, January 16, 2011
Saving Eddy, one step at a time

On his blog, Chris is currently documenting (with pictures and words) how he and a small group of people are trying to save a baby elephant that they found abandoned by its mother in the wild. It's a great story of caring and perseverance.
I hope Eddy makes it!
Saturday, January 15, 2011
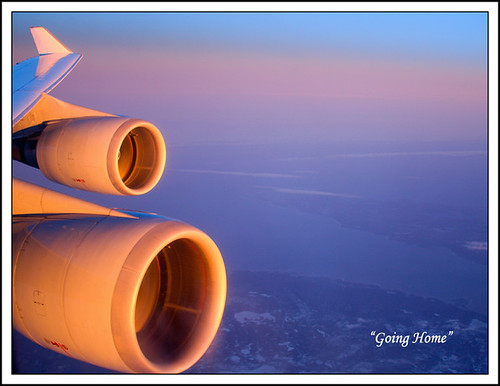
Photo Carousel #9: "Going Home"
This is my ninth Photo Carousel entry, "Going Home". If I do humbly say so myself, I really like this photo! :-)
I took this out the window of a Singapore Airlines 747 on my way home from Germany to New York in March 2010.
We were flying straight into the sunset for a large part of this flight and I got some amazing photos out the window. However, it was difficult to do it without getting reflections from the windows in the photos, especially when facing forward in my seat.
So....I turned around to try to shoot backward and I saw this great shot. The sky was perfect, I was able to get both engines in the photo while they were glowing in the sunset, and the ground is still visible in the dim light below.
Looking for a different vantage point from which to take photos (and some good luck with the light!) came together to make a cool photo!
For this particular entry of Photo Carousel, I don't have a specific compositional or technical lesson that I'm communicating. Instead, the point I want to make is a logistical one. It's a lesson that I learned from one of my favorite photographers a long time ago, and even though it's somewhat common sensical, it really never occurred to me when taking photos.
The premise is simple: As you're exploring a place or thing and spending time to photograph it, turn around in the opposite direction and explore further. See if there are more photos to take of whatever you're photographing by simply changing your vantage point.
I can't even say the number of times I've done this and ended up with additional great photos that were taken in a location looking in the total opposite direction than I was originally looking.
During sunsets, at the beach, in the mountains, even at family parties. Turn around and continue to look around. You never know what you'll find!
Tuesday, January 11, 2011
Easily build your own Photoshop panel with your most often used commands

Your editing life can be a lot easier. Simply use the free Adobe Configurator tool located at this link to create your own custom panel that can sit in your Photoshop workspace, and put all of your most often used commands in the panel so you can access them with one simple click.
There's a lot of power to doing this. First, you save time by not repeatedly going into menus (some of which are several levels deep). Second, you can build a pseudo-workflow into the panel simply by putting the commands in the order you typically use them. Third, any command or action can be included in these panels, saving you the time of clicking into other default Photoshop panels in the workspace.
To give you an idea of what this looks like, I put my main photo editing panel that I created to the left side of this post. You can see that I have some commonly used tools at the top of the panel, and I also included buttons for the commands that I use most often from the menus when I edit for some purpose (i.e., web, prints, etc).
It's great. It's free. It's so easy to do it! Give it a try and you'll be spending less time hunting around menus and more time getting your editing done.
Enjoy!
Thursday, January 6, 2011
Pathways #2: Get better exposures straight out of your camera
Background:
The first post in my Pathways series forms the essence of what this blog is all about...discovering photography, learning about it, enjoying it, and improving your own photography. This second post is about an easy way to get technically better looking photos straight out of your camera. Try it, you'll like it! :-)
You can read books, magazines, take photography classes/workshops, etc, to help you improve your photography skills. This is all great, but the key thing to remember is that you shouldn't do these activities in a passive manner. You have to be active. You need to pull concepts out of these activities that resonate with you, try them, expand on them, and put them in your "photography bag of tricks" to improve your skills and realize your photographic vision.
You also need to come up with your own ideas about how to improve. You can't learn photography just from books, classes, magazines, and the internet. Ask yourself what you can try that's new. What's something that hasn't been seen before? What's something that you haven't tried before? Be open to new ideas and try things, and that's how you'll improve.
Today's topic:
The topic for today is one of the things that had a major impact on the technical aspect of my photography when I finally worked on it a few years ago. I'm speaking about getting a much better handle on "proper" exposure. I put "proper" in quotes because proper exposure for a given image is somewhat subjective. But most people can look at a photo and inherently get a feel for whether it's underexposed, overexposed, or "just right".
This was an important topic for me because after looking at some of my older photos, I began to see how much better they could have been straight out of the camera if the exposure was a little more "right". A little more "punchy". Conducting some experiments in Photoshop I quickly saw that another +1/3 or +1/2 stop of exposure here, or -1/3 stop of exposure there would significantly increase the "rightness" of my photos.
Seeing the results of my experiments above, I was easily motivated to more actively examine the exposures I was choosing for my photos so that I could more accurately express a scene the way I wanted to instead of the way the camera wanted to when shooting in full Auto mode.
Before going down this path I read a few books to get some concepts down about "proper" exposure. One of them was Jeff Wignall's book "Exposure". Another was Michael Freeman's book "Perfect Exposure". I used these two books to learn more about the best times to take manual control of metering and exposure (instead of letting the camera auto-expose), and how to use metering/exposure to help enhance the subject of my photos and my creative vision.
Things very quickly opened up for me...
Once the concept of taking control of exposure for technical and creative reasons was hammered into my head, I now do it much more often than not. The two keys to being able to do this successfully are:
When you point your camera at a mostly bright scene, it's typically going to underexpose it. If you point it at a mostly dark scene, it's typically going to overexpose it. This is probably not what you want and both of these situations will make your photos less effective because in the former situation the colors will be dull, the image will feel lifeless, and it will be too dark. It won't feel right. In the latter situation your shadow areas will be too bright, your subject will probably be ruined, etc. Both situations will reduce the apparent sharpness of your photos as well.
So, how do you compensate for these things and prevent them? You have to understand your camera's metering modes, what you're aiming your camera at, and how your camera will respond. Most importantly though, you need to have a vision in your head of what you want the outcome of the photo to be.
I'll assume for the purpose of this post that people who are interested in this topic will be shooting with advanced compact cameras or digital SLR's (DSLR) that have various metering modes, exposure compensation options, etc.
Try this experiment:
Go find a very bright scene to photograph. Maybe something like your car on your driveway in bright sunlight. Maybe your house on a bright sunny day. Maybe a bright lamp in your house. Put your camera in automatic mode and take a picture of it. Now, open that photo in Photoshop and use the Exposure adjustment to add +1/3 stop of exposure to it. Look better? Most likely it does. Reset and try adding +1/2 stop of exposure to the base picture? Is +1/2 too much? Maybe, maybe not. Maybe you need even more depending on how bright the scene was. Only you can say for sure based on what you like.....
The goal of this experiment is to demonstrate my point in the paragraph above about understanding what you're pointing your camera at and how it will respond. With a very bright scene, your camera will likely underexpose it to try to average out the brightness. You'll be left with a bland looking photo that doesn't look quite right.
Let's use an example photo of mine. First is the photo straight out of my camera of a bright scene of some boats in Florida that was shot in automatic mode with evaluative metering. Second is the same exact photo after I opened it in Photoshop and did nothing else to it except add +3/4 stop of exposure to it using the Exposure command. You can see that the first photo is too dark, it's lifeless, and the colors are bland. The second photo looks "right", it's punchier, and the colors are bright and accurate.
Had I been thinking about it at the time, I would have realized that I was shooting a very bright scene and my camera would be tricked into underexposing it to average out the brightness. I then simply would have taken one second to dial in +1/2 or +3/4 stop of exposure and taken the shot. The out-of-camera picture would have been just right with this one simple adjustment.
If you understand this type of lighting situation and you know how your camera will respond to it, you can simply dial in +1/3 or +1/2 stop of exposure at the time you're taking the photo and you'll probably get better exposed photos straight out of the camera that will be more pleasing to the eye. Don't use your camera in Auto mode when you know that you're shooting a tricky lighting situation. Take control yourself to achieve better results.
The same exact scenario applies for very dark scenes. Shoot one in Auto mode and then use Photoshop to put in -1/3 or -1/2 stop of exposure to see which shot you like better. My guess is that one of the two adjusted images probably looks better than the one that came out of the camera.
Interesting, right?
By getting a better understanding of the lighting in a scene and what my cameras will do with it, I now know when I need to use exposure compensation for a particular shot. Doing this has led to much more consistent and "likeable" photos straight out of my camera with no post-processing, and the less time that I need to spend on the computer editing photos the better.
This article does not address overexposing or underexposing for creative purposes....that's a whole separate topic. What I'm trying to address here is simply getting better and more technically consistent photos out of your camera when you're facing tricky light.
All of the above was written with the primary thought that your camera was set to use evaluative or matrix metering, but most advanced cameras also have center-weighted, partial, and spot metering modes as well. I'm not going to summarize what they are because it's beyond the scope of this post and your camera manual will explain them for you. There are also these two quick articles that I found that cover the topics efficiently:
Try some experiments to see how these topics come together for you. Hopefully you'll get more effective and properly exposed images without the need for editing on the computer.
Let me know if you have any feedback on this post...Thanks for reading!
The first post in my Pathways series forms the essence of what this blog is all about...discovering photography, learning about it, enjoying it, and improving your own photography. This second post is about an easy way to get technically better looking photos straight out of your camera. Try it, you'll like it! :-)
You can read books, magazines, take photography classes/workshops, etc, to help you improve your photography skills. This is all great, but the key thing to remember is that you shouldn't do these activities in a passive manner. You have to be active. You need to pull concepts out of these activities that resonate with you, try them, expand on them, and put them in your "photography bag of tricks" to improve your skills and realize your photographic vision.
You also need to come up with your own ideas about how to improve. You can't learn photography just from books, classes, magazines, and the internet. Ask yourself what you can try that's new. What's something that hasn't been seen before? What's something that you haven't tried before? Be open to new ideas and try things, and that's how you'll improve.
Today's topic:
The topic for today is one of the things that had a major impact on the technical aspect of my photography when I finally worked on it a few years ago. I'm speaking about getting a much better handle on "proper" exposure. I put "proper" in quotes because proper exposure for a given image is somewhat subjective. But most people can look at a photo and inherently get a feel for whether it's underexposed, overexposed, or "just right".
This was an important topic for me because after looking at some of my older photos, I began to see how much better they could have been straight out of the camera if the exposure was a little more "right". A little more "punchy". Conducting some experiments in Photoshop I quickly saw that another +1/3 or +1/2 stop of exposure here, or -1/3 stop of exposure there would significantly increase the "rightness" of my photos.
Seeing the results of my experiments above, I was easily motivated to more actively examine the exposures I was choosing for my photos so that I could more accurately express a scene the way I wanted to instead of the way the camera wanted to when shooting in full Auto mode.
Before going down this path I read a few books to get some concepts down about "proper" exposure. One of them was Jeff Wignall's book "Exposure". Another was Michael Freeman's book "Perfect Exposure". I used these two books to learn more about the best times to take manual control of metering and exposure (instead of letting the camera auto-expose), and how to use metering/exposure to help enhance the subject of my photos and my creative vision.
Things very quickly opened up for me...
Once the concept of taking control of exposure for technical and creative reasons was hammered into my head, I now do it much more often than not. The two keys to being able to do this successfully are:
- Developing a firm understanding of how your camera's metering system works and...
- How the metering system responds to different lighting situations.
When you point your camera at a mostly bright scene, it's typically going to underexpose it. If you point it at a mostly dark scene, it's typically going to overexpose it. This is probably not what you want and both of these situations will make your photos less effective because in the former situation the colors will be dull, the image will feel lifeless, and it will be too dark. It won't feel right. In the latter situation your shadow areas will be too bright, your subject will probably be ruined, etc. Both situations will reduce the apparent sharpness of your photos as well.
So, how do you compensate for these things and prevent them? You have to understand your camera's metering modes, what you're aiming your camera at, and how your camera will respond. Most importantly though, you need to have a vision in your head of what you want the outcome of the photo to be.
I'll assume for the purpose of this post that people who are interested in this topic will be shooting with advanced compact cameras or digital SLR's (DSLR) that have various metering modes, exposure compensation options, etc.
Try this experiment:
Go find a very bright scene to photograph. Maybe something like your car on your driveway in bright sunlight. Maybe your house on a bright sunny day. Maybe a bright lamp in your house. Put your camera in automatic mode and take a picture of it. Now, open that photo in Photoshop and use the Exposure adjustment to add +1/3 stop of exposure to it. Look better? Most likely it does. Reset and try adding +1/2 stop of exposure to the base picture? Is +1/2 too much? Maybe, maybe not. Maybe you need even more depending on how bright the scene was. Only you can say for sure based on what you like.....
The goal of this experiment is to demonstrate my point in the paragraph above about understanding what you're pointing your camera at and how it will respond. With a very bright scene, your camera will likely underexpose it to try to average out the brightness. You'll be left with a bland looking photo that doesn't look quite right.
Let's use an example photo of mine. First is the photo straight out of my camera of a bright scene of some boats in Florida that was shot in automatic mode with evaluative metering. Second is the same exact photo after I opened it in Photoshop and did nothing else to it except add +3/4 stop of exposure to it using the Exposure command. You can see that the first photo is too dark, it's lifeless, and the colors are bland. The second photo looks "right", it's punchier, and the colors are bright and accurate.
 |
| Original photo, underexposed due to the brightness of the scene |
 |
| Original photo with +3/4 stop of Exposure added in Photoshop. Much better! |
If you understand this type of lighting situation and you know how your camera will respond to it, you can simply dial in +1/3 or +1/2 stop of exposure at the time you're taking the photo and you'll probably get better exposed photos straight out of the camera that will be more pleasing to the eye. Don't use your camera in Auto mode when you know that you're shooting a tricky lighting situation. Take control yourself to achieve better results.
The same exact scenario applies for very dark scenes. Shoot one in Auto mode and then use Photoshop to put in -1/3 or -1/2 stop of exposure to see which shot you like better. My guess is that one of the two adjusted images probably looks better than the one that came out of the camera.
Interesting, right?
By getting a better understanding of the lighting in a scene and what my cameras will do with it, I now know when I need to use exposure compensation for a particular shot. Doing this has led to much more consistent and "likeable" photos straight out of my camera with no post-processing, and the less time that I need to spend on the computer editing photos the better.
This article does not address overexposing or underexposing for creative purposes....that's a whole separate topic. What I'm trying to address here is simply getting better and more technically consistent photos out of your camera when you're facing tricky light.
All of the above was written with the primary thought that your camera was set to use evaluative or matrix metering, but most advanced cameras also have center-weighted, partial, and spot metering modes as well. I'm not going to summarize what they are because it's beyond the scope of this post and your camera manual will explain them for you. There are also these two quick articles that I found that cover the topics efficiently:
- Digital Photography School - "Metering Modes Explained"
- Digital Photography School - "Introduction to Metering Modes"
Try some experiments to see how these topics come together for you. Hopefully you'll get more effective and properly exposed images without the need for editing on the computer.
Let me know if you have any feedback on this post...Thanks for reading!
Tuesday, January 4, 2011
Photo Carousel #8: "Glass Blower"
 |
| "Glass Blower" |
Here's a hot shot (sorry, couldn't resist!) that I took at the Corning Museum of Glass. This is my eighth Photo Carousel entry.
If you've never been to Corning area, I can say that it's a nice family trip with many things to see and do, especially considering its close proximity to the Finger Lakes region of New York. We live far away from that area so it's a long drive for us, but we combine the trip to Corning with the July 4th Indycar race at Watkins Glen International Speedway. We also do some hiking in Watkins Glen Gorge and rent a boat to go out on Seneca Lake for a 1/2 day. A nice way to spend a few days...
While at Corning, I wanted to capture the spirit of the place....which is all about making glass and the skill and concentration required to do it. There are many ways to capture that, but I thought this shot was a perfect opportunity.
My daughter got selected to be a in a glass breaking demonstration, and for her participation in the demo she won a small glass bud vase. They mentioned when they gave her the prize that the man who made it would be doing a glass blowing demonstration just across the hall so we went over to see him. I saw the opportunity for this shot developing so I quickly got ready for it.
From the creative perspective, I composed this shot to place the three major interest points (his face, his hand, the flame) in strategic locations to keep the viewer's eye bouncing around between them. I also wanted to create the black free space in the upper left to give the photo some room to breathe. There was no need to have anything in that part of the frame because it only would have distracted from the main elements.
I think this photo is successful and interesting because of it's simplicity. There are the three main elements within the frame that are closely tied together, and that's it. The slow shutter allowed the flame to blur a bit to give the photo some dynamic quality. I spot metered off the glove.
Saturday, January 1, 2011
People, coffee, commonality, a tree, and New York City
Happy New Year!
I hope everyone who reads this blog from around the world enjoyed their New Years celebrations last night and that you're resting/recovering nicely today. My first nap next to the fire on this tiring day is about to begin as soon as I hit 'submit' on this post to get it out there! :-)
To date this blog has been visited by people in 74 different countries, and I think that's pretty cool. I've received some nice email from people who have connected with it one way or another, and I hope it becomes even more widely read in 2011. If you like it, forward the link to your friends!
As is true with most of the posts on this blog, this one is tied to photography (albeit loosely for this particular post today).
Every year, my wife and I take the kids down to New York City to do some exploring around the area of Rockefeller Center. We see the giant Christmas tree, the windows of Macy's, Lord & Taylor, and Sachs 5th Avenue which are all decorated with Christmas scenes, St. Patrick's Cathedral, and just generally enjoy the good holiday spirit in the air. This year, we also went to see the show Wintuk, which was very good and I would recommend.
I was shooting with my Canon S95 just trying to grab some nice scenes and some things occurred to me during the act of taking pictures that I thought were interesting to share here...
Taking a trip down to the city at this time of year isn't necessarily about just seeing the sights, having a nice dinner, snapping some photos, and going home. On a deeper level it's about participating in an event with many thousands of other people and enjoying the common feelings that we all share around the holidays.
As we were walking around and I was in the process of taking photos and disappearing into my "world of photography" where I concentrate on what I'm doing, I began listening to people talking. Not what they were saying, but how they were saying it. The excited tones of their voices, the enjoyment, the laughter. Adults, kids, teenagers, grandparents. Everyone laughing, smiling, enjoying the moments, and tolerating the large crowds as we all hopped over slush puddles and snow piles from the recent blizzard in this area.
The thing that really struck me were all of the different languages. I don't know what they all were, but I heard some Spanish, French, Arabic, German, Japanese, and many more. A very international crowd and a nice thing to see. People from all over the world coming together in the area of a few small city blocks to celebrate the holidays....and all gathered around the Rockefeller Center Christmas tree. Smiling at it, taking pictures in front of it, pointing at it, and watching the ice skaters on the ice rink underneath it.
I stopped taking photos just to watch the people for a while and I got a nice feeling inside. This, I thought, is exactly what the holidays are about. Pure joy. The commonality that we all share no matter where we're from of enjoying the holidays with our family and friends, reliving old memories, making new memories, etc.
We went inside to grab a coffee for me and Jan and some hot chocolate for the kids. As I was standing on this huge line to get the drinks, I continued to watch people come together over a simple thing.....coffee. Sitting, chatting, laughing, and everyone was looking at their photos of the day. Every year that we make this trip, I look around and notice more and more cameras. Small ones, big ones, smart phones, etc. Whatever the size or type, everyone was taking and enjoying their photos. Photography bringing people together, as it always has...
This is why photography is important in my life. I honestly don't think I would have noticed many of these things unless I had been looking around for photo opportunities. Actively looking around for possible photos, finding them, and taking them helps to open my eyes to what's going on around me and enjoy things more. I see things in a different light, even if I'm not actually taking photos at that instant.
As I was standing there I saw a sign that said "I lost a friend once. Yesterday I found her again over coffee". A nice sentiment about just sitting down to relax for a bit and talking with a friend or family member to reconnect. Happy New Year!

I hope everyone who reads this blog from around the world enjoyed their New Years celebrations last night and that you're resting/recovering nicely today. My first nap next to the fire on this tiring day is about to begin as soon as I hit 'submit' on this post to get it out there! :-)
To date this blog has been visited by people in 74 different countries, and I think that's pretty cool. I've received some nice email from people who have connected with it one way or another, and I hope it becomes even more widely read in 2011. If you like it, forward the link to your friends!
As is true with most of the posts on this blog, this one is tied to photography (albeit loosely for this particular post today).
Every year, my wife and I take the kids down to New York City to do some exploring around the area of Rockefeller Center. We see the giant Christmas tree, the windows of Macy's, Lord & Taylor, and Sachs 5th Avenue which are all decorated with Christmas scenes, St. Patrick's Cathedral, and just generally enjoy the good holiday spirit in the air. This year, we also went to see the show Wintuk, which was very good and I would recommend.
 |
| The colorful set of "Wintuk" |
Taking a trip down to the city at this time of year isn't necessarily about just seeing the sights, having a nice dinner, snapping some photos, and going home. On a deeper level it's about participating in an event with many thousands of other people and enjoying the common feelings that we all share around the holidays.
 |
| The "Believe" sign on the side of Macy's on 34th Street |
The thing that really struck me were all of the different languages. I don't know what they all were, but I heard some Spanish, French, Arabic, German, Japanese, and many more. A very international crowd and a nice thing to see. People from all over the world coming together in the area of a few small city blocks to celebrate the holidays....and all gathered around the Rockefeller Center Christmas tree. Smiling at it, taking pictures in front of it, pointing at it, and watching the ice skaters on the ice rink underneath it.
 |
| The tree, the 30 Rock building, and some holiday flags |
We went inside to grab a coffee for me and Jan and some hot chocolate for the kids. As I was standing on this huge line to get the drinks, I continued to watch people come together over a simple thing.....coffee. Sitting, chatting, laughing, and everyone was looking at their photos of the day. Every year that we make this trip, I look around and notice more and more cameras. Small ones, big ones, smart phones, etc. Whatever the size or type, everyone was taking and enjoying their photos. Photography bringing people together, as it always has...
This is why photography is important in my life. I honestly don't think I would have noticed many of these things unless I had been looking around for photo opportunities. Actively looking around for possible photos, finding them, and taking them helps to open my eyes to what's going on around me and enjoy things more. I see things in a different light, even if I'm not actually taking photos at that instant.
As I was standing there I saw a sign that said "I lost a friend once. Yesterday I found her again over coffee". A nice sentiment about just sitting down to relax for a bit and talking with a friend or family member to reconnect. Happy New Year!
Subscribe to:
Posts (Atom)